How to Give your Pictures a Geeky Touch with ASCII Art (and Python)
A handful of printable characters is all you need to see the world.

ASCII Art is an early graphic design technique that generates images using characters instead of pixels. Not so long ago, this method made up for the lack of graphical ability in printers and computer terminals. While it is true that nowadays it is entirely obsolete, some people still find it cute, mainly because of nostalgia (yep, I am that old).
Although ASCII Art may look too raw in its original form, with just some minor additions we can render some gorgeous pictures that will definitely give a nice touch to any document or web page. Specifically, we will apply a bit of colour to the characters and to the background. This visual aid makes the pictures even more appealing.
This piece will show how to code from scratch the algorithm for this “enhanced” version of ASCII Art, using Python and the package pillow. The complete source code is available later in the document, along with several examples.

How it works
The output images result from an optical effect caused by the different intensity of each character. Screens and printers draw characters as a group of pixels or dots. For example, on a black screen, the characters . and B could look like in Figure 2. The former is a good choice for the darkest areas of the image, while the latter could represent the brightest ones. Needless to say, the specific pixels that are active vary depending on the font used (in this case, GNU Typewriter).

Consequently, the first step during the generation of an ASCII Art picture is picking a font of our liking, defining the charset to use, and sorting these characters by brightness. For example, Figure 3 shows an example of a sorted list. My personal advice is to pick fonts that include a wide range of symbols, are somewhat thick (weight), not too narrow (width), nor too oblique (slope). Regarding typefaces with serifs, it depends on the font size and your personal preferences. Eventually, it is a trial-and-error process.

The algorithm
In the following sections, you may find the complete source code in Python and some examples, all of them available as gists. Basically, the main program performs the following steps:
- The functionality is encapsulated in a class that you have to instantiate, providing the required arguments. Let’s imagine that we would like to generate an ASCII art of dimensions 32x32 characters.
- As mentioned above, it retrieves the given font in TrueType format and a list of characters. Then it sorts them by brightness (see method
_calibrate()). - It creates two downsampled versions of the original image, one in grayscale and the other retaining the actual colour. Their sizes must match the desired output, but in pixels (so they will be 32x32 pixels). By doing this, each pixel of the new images directly corresponds to a character in the resulting composition.
- For each downsampled pixel, we use its brightness from the grayscale image to pick the appropriate character representing that level of intensity. Optionally, we also assign foreground and background colours based on the colour image we scaled down before.
- After repeating step 4 for all 32x32 pixels, the image is finally rendered.
Figure 4 below shows the algorithm visually. There are a couple steps that have been labelled with the Greek letter lambda (λ). These are places where the user may customize the mapping functions and tailor them to their specific needs (probably using a lambda function in Python and hence the notation). The source code contains some predefined mappings, so it is easier to increase contrast, add colour, reverse transformations and the like.

Example: Eye
As mentioned before, mapping functions (in the form of Python lambdas) allow for great customization. This example has a black background (MAP_BLACK) so we choose to map brightness directly to character intensity (MAP_DIRECT) and retain the original colour (MAP_DIRECT). The ASCIIArt class is included in the last section.
picture = ASCIIArt(img_path='amanda-dalbjorn-UbJMy92p8wk-unsplash.jpg',
                   font_path='Gnutypewriter-XgMG.ttf',
                   font_size=32,
                   charset=ASCIIArt.CHARSET_CUSTOM,
                   ascii_width=128,
                   brightness_fn=ASCIIArt.MAP_DIRECT,
                   fg_color_fn=ASCIIArt.MAP_DIRECT,
                   bg_color_fn=ASCIIArt.MAP_BLACK,
                   line_separation=-0.25
                  )

picture.render('amanda-dalbjorn-UbJMy92p8wk-unsplash.png')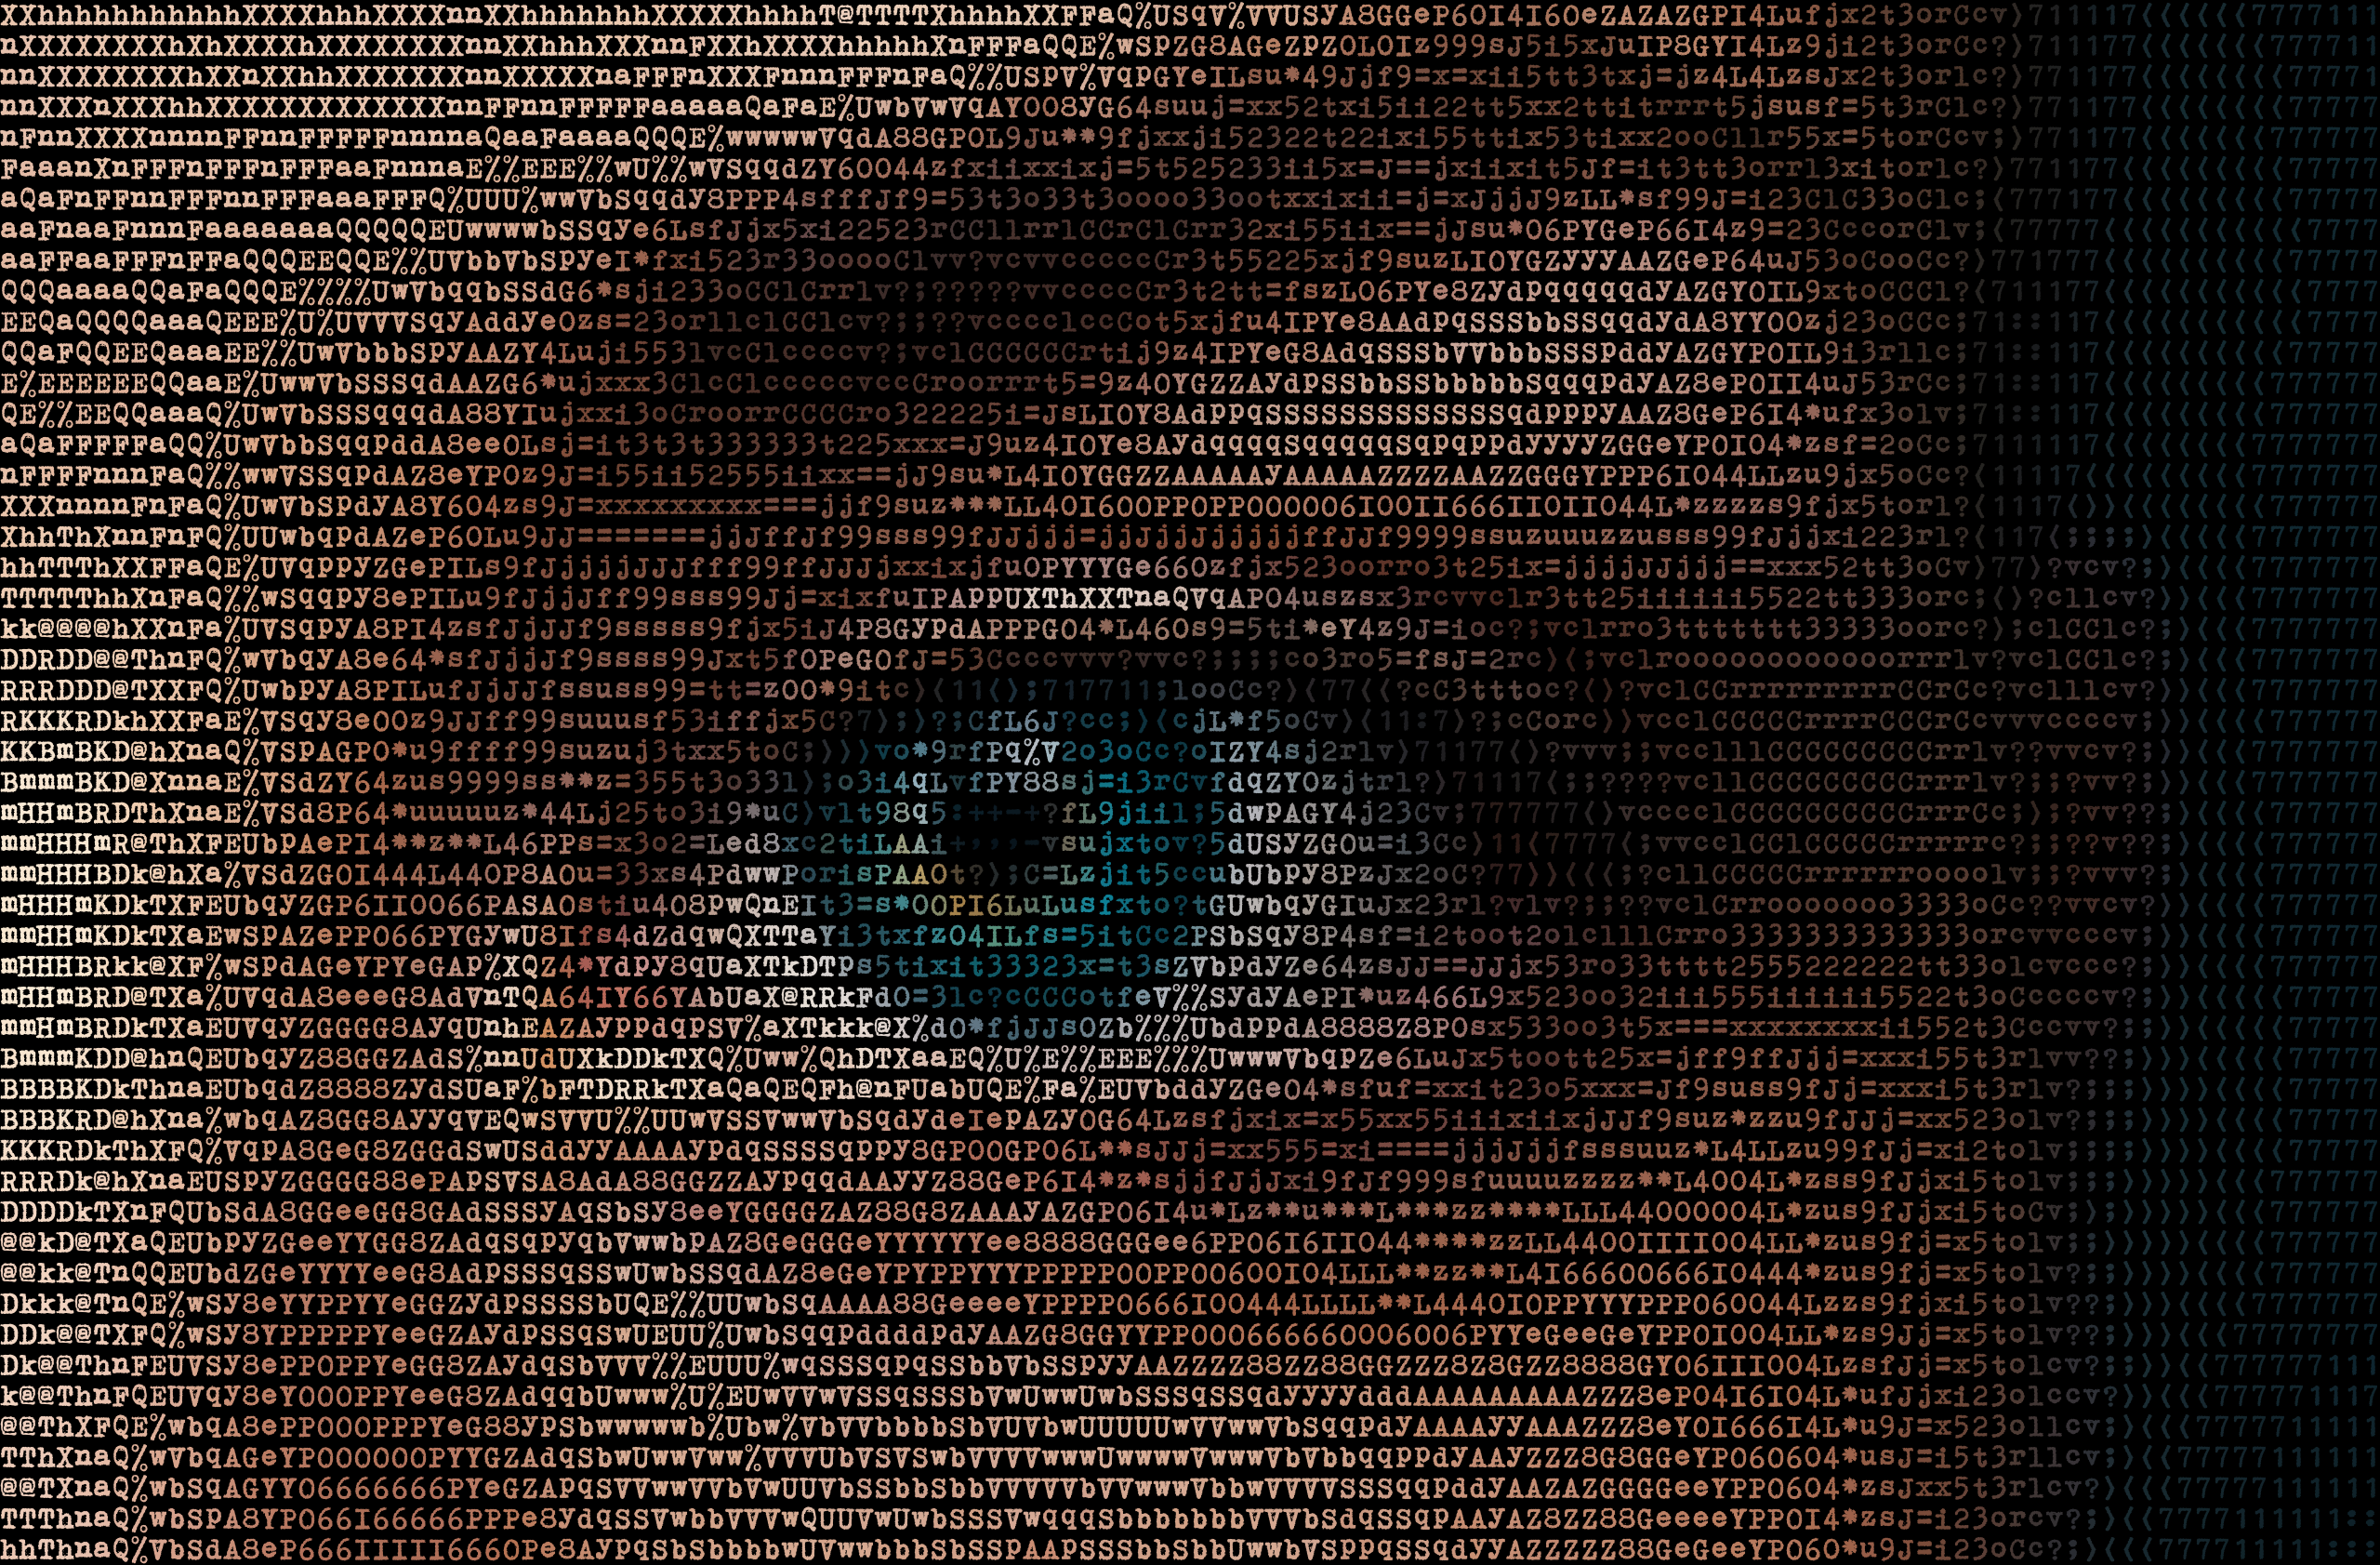
Example: Rubber duck
This example is the opposite: seeing that the background is white, so we map brightness inversely (MAP_REVERSE). This procedure ensures that characters only appear in the darkest regions of the picture. To keep the background clean of characters, I have added some extra whitespaces to the charset, so the lower values do not get dots, commas or similar symbols.
picture = ASCIIArt(img_path='brett-jordan-wF7GqWA3Tag-unsplash.jpg',
                   font_path='Gnutypewriter-XgMG.ttf',
                   font_size=32,
                   charset=ASCIIArt.CHARSET_CUSTOM + 3*' ',
                   ascii_width=192,
                   brightness_fn=ASCIIArt.MAP_REVERSE,
                   fg_color_fn=ASCIIArt.MAP_DIRECT,
                   bg_color_fn=ASCIIArt.MAP_WHITEN,
                   line_separation=-0.25
                  )

picture.render('brett-jordan-wF7GqWA3Tag-unsplash.png')
Example: Fish
Here we use only two characters with a strong sense of direction (/ and \) to give the viewer the impression of volume and texture in the scales of the fish. I manually repeated these symbols in the charset until I got the proportion right and the resulting image was aesthetically pleasing.
picture = ASCIIArt(img_path='david-clode-ekthrVC_DVs-unsplash.jpg',
                   font_path='Gnutypewriter-XgMG.ttf',
                   font_size=32,
                   charset='  \\\\\\\\\\\\\\///',
                   ascii_width=128,
                   brightness_fn=ASCIIArt.MAP_DIRECT,
                   fg_color_fn=ASCIIArt.MAP_DIRECT,
                   bg_color_fn=ASCIIArt.MAP_CURVE,
                   line_separation=-0.25
                  )

picture.render('david-clode-ekthrVC_DVs-unsplash.png')
The code
The following gist contains the source code for the main class, ready to run. There are some predefined character sets and mapping functions (lambdas) at the top of the file. After instantiating the object (which invokes the constructor), the user is expected to call the render() method, so those are the best places to start dissecting how the program works.
# import packages
from PIL import Image, ImageDraw, ImageFont
from random import uniform

class ASCIIArt:
    """ Renders an ASCII Art image. """

    # Example charsets
    CHARSET_ALPHANUM = ' 0123456789abcdefghijklmnopqrstuvwxyzABCDEFGHIJKLMNOPQRSTUVWXYZ'
    CHARSET_FULL     = CHARSET_ALPHANUM + ' !"#$%&\'()*+,-./:;<=>?@[\\]^_`{|}~'
    CHARSET_NUMBERS  = ' 0123456789'
    CHARSET_MATH     = ' .,:/\\()[]{}*xyz+-=<>%0123456789'
    CHARSET_SYMBOLS  = ' .:-=+*#%@'
    CHARSET_BLOCK    = ' #'
    CHARSET_CUSTOM   = CHARSET_ALPHANUM + '"#$%*+,-.:;<=>?@^~'

    # Example mapping functions
    MAP_DIRECT  = lambda x: x
    MAP_REVERSE = lambda x: 1 - x
    MAP_NOISY   = lambda x: x + uniform(-0.1, 0.1)
    MAP_CURVE   = lambda c:(c[0]**2, c[1]**2, c[2]**2, c[3])
    MAP_WHITEN  = lambda c:(c[0]*1.5, c[1]*1.5, c[2]*1.5, c[3])
    MAP_FAINT   = lambda c:(c[0]/3, c[1]/3, c[2]/3, c[3])
    MAP_WHITE   = lambda c: (1, 1, 1, 1)
    MAP_BLACK   = lambda c: (0, 0, 0, 1)


    def __init__(self,
                 img_path,                       # source image path
                 font_path,                      # font path
                 charset=CHARSET_BLOCK,          # characters to use (string)
                 ascii_width=40,                 # number of text columns
                 aspect_correction=1,            # additional aspect correction
                 font_size=32,                   # font size in pixels
                 brightness_fn=MAP_DIRECT,       # brightness function
                 fg_color_fn=MAP_DIRECT,         # foreground color function
                 bg_color_fn=MAP_BLACK,          # background color function
                 background_color='#00000000',   # background color
                 character_separation=0.,        # additional character separation
                 line_separation=0.):            # additional line separation
        """ Initializes ASCII Art instance. """

        # store arguments
        self.img_path = img_path
        self.font_path = font_path
        self.font_size = font_size
        self.brightness_fn = brightness_fn
        self.fg_color_fn = fg_color_fn
        self.bg_color_fn = bg_color_fn
        self.background_color = background_color

        # font setup: load font and retrieve dimensions
        self.font = ImageFont.truetype(self.font_path, self.font_size)
        font_ascent, font_descent = self.font.getmetrics()    # baseline to top, baseline to bottom
        font_m_width, font_m_height = self.font.getsize('m')  # LaTeX em
        font_total_height = font_ascent + font_descent
        self.character_separation = int(font_m_width * character_separation)
        self.line_separation = int(font_total_height * line_separation)
        self.font_box_dimension = (font_m_width + self.character_separation, font_total_height + self.line_separation)
        self.aspect_correction = self.font_box_dimension[0]/self.font_box_dimension[1]
        self.aspect_correction *= aspect_correction  # additional aspect correction

        # sort character set by brightness
        self.charset = charset
        self._calibrate()

        # load original image
        self.source_image = Image.open(img_path).convert('RGBA')

        # color image: resize
        self.width  = ascii_width
        scale = self.width / self.source_image.size[0]
        self.height = int(self.source_image.size[1] * scale * self.aspect_correction)
        self.color_image = self.source_image.resize((self.width, self.height), Image.BILINEAR)

        # gray scale: Floyd-Steinberg dither
        self.grey_image = self.color_image.convert("L")


    def _calculate_everything(self):
        """ This does the heavy lifting. """

        self.ascii_data = []
        self.just_text = ''

        # for every row
        for y in range(0, self.grey_image.size[1]):

            ascii_line = []
            # for every pixel in row
            for x in range(0, self.grey_image.size[0]):

                def _clamp(x, lower, higher):
                    """ Ensure lower < x < higher """
                    return max(min(higher, x), lower)

                # retrieve brightness
                brightness = self.grey_image.getpixel((x, y)) / 255.

                # pick character
                brightness = self.brightness_fn(brightness)
                brightness = _clamp(brightness, 0.0, 1.0)
                n = len(self.charset) - 1
                index = int(n * brightness)
                character = self.charset[index]

                # color code
                color = self.color_image.getpixel((x, y))
                color = tuple(x/255. for x in color)

                # foreground
                fg_color = self.fg_color_fn(color)
                fg_color = tuple(_clamp(x, 0.0, 1.0) for x in fg_color)
                fg_color = tuple(int(x*255) for x in fg_color)

                # background
                bg_color = self.bg_color_fn(color)
                bg_color = tuple(_clamp(x, 0.0, 1.0) for x in bg_color)
                bg_color = tuple(int(x*255) for x in bg_color)

                # store
                ascii_line.append((character, fg_color, bg_color))
                self.just_text += character

            # end line
            self.ascii_data.append(ascii_line)
            self.just_text += '\n'


    def _calibrate(self):
        """ Calculates actual character brightness and sorts the charset. """

        characters = []

        # for each character in charset
        for c in self.charset:

            # create a black image and draw the character in white
            img = Image.new('1', self.font_box_dimension, 0)
            d = ImageDraw.Draw(img)
            self._draw_character(d, 0, 0, c, 1)

            # count light pixels and divide by total
            brightness = 0
            for y in range(self.font_box_dimension[1]):
                for x in range(self.font_box_dimension[0]):
                    brightness += img.getpixel((x,y))

            ratio = brightness / self.font_box_dimension[0] / self.font_box_dimension[1]
            characters.append((c, ratio))

        # sort characters by brightness
        sorted_by_ratio = sorted(characters, key=lambda x: x[1])
        self.charset = [ x[0] for x in sorted_by_ratio ]


    def _draw_box(self,
                  d,        # drawing context
                  x, y,     # coordinates
                  fill):    # color
        """ Draws the background box for each character. """

        # calculate coordinates
        step_x = self.font_box_dimension[0]
        step_y = self.font_box_dimension[1]
        point1 = (x     * step_x, y     * step_y)
        point2 = ((x+1) * step_x, (y+1) * step_y)

        # draw and fill rectangle
        d.rectangle([point1, point2], outline=None, fill=fill)


    def _draw_character(self,
                        d,          # drawing context
                        x, y,       # coordinates
                        character,  # character to draw
                        fill):      # color
        """ Draws character centered in box. """

        # calculate coordinates
        step_x, step_y  = self.font_box_dimension
        char_width, char_height = self.font.getsize(character)
        font_offset_x, font_offset_y = self.font.getoffset(character)
        margin_x = (step_x - char_width - font_offset_x)/2
        margin_y = (step_y - char_height - font_offset_y)/2

        # draw character in given color
        d.text((x*step_x + margin_x, y*step_y + margin_y), character, fill=fill, font=self.font)


    def render(self,
               output_path):    # path to resulting image
        """ Renders the ASCII Art image. """

        # perform all calculations
        self._calculate_everything()

        # prepare image
        step_x, step_y = self.font_box_dimension
        output_dimension = (step_x * self.width, step_y * self.height)
        self.ratio = self.width / self.height
        self.img = Image.new('RGBA', output_dimension, self.background_color)
        d = ImageDraw.Draw(self.img)

        # first pass: generate background
        for y, line in enumerate(self.ascii_data):
            for x, data in enumerate(line):
                self._draw_box(d, x, y, data[2])

        # second pass: generate characters
        for y, line in enumerate(self.ascii_data):
            for x, data in enumerate(line):
                self._draw_character(d, x, y, data[0], data[1])

        # save results
        self.img.save(output_path)
Conclusion
Even though this method somehow diverges from the purest form of ASCII Art, it creates beautiful effects that will definitely set your creations apart. In addition to the customization possibilities demonstrated above, I invite you to fiddle with the source code and change everything you need to suit your needs. There are plenty of things to do, such as producing HTML source, text strings with terminal colour codes or even video clips by assembling several frames together. The possibilities are endless.
I hope you enjoyed this post and found it helpful. Thank you for reading, and please feel free to leave any comments!
Resources
[2] Pillow package
